Showing posts with label Recipe. Show all posts

Friday, January 4, 2013

Healthy Living - First Thoughts on Juicing

Ok, so I got the juicer and I am super excited {can you tell?}!

I cannot say that after making 3 juices that I feel like 1000 bucks or anything, but I know I am providing my body with extra vitamins and nutrients that I would not ordinarily have in my diet. I mean, kale - who just eats kale? Not this girl. I do eat a lot of veggies, but it can be rather sporadic. This is a way to incorporate extra veggies in my diet {and my family's diet once they get used to the juices or I find a recipe they love} that doesn't depend on my mood or what "sounds good" for dinner.

One thing I am noticing is the amount of "waste" that is put off when juicing. It is a lot. So this has me thinking about reusing these pulps and skins in soups and such. That will mean a little more prep time and strategically juicing in a specific order {I don't really want apple peels in my veggie soup}, but I think it will be worth the effort.

I also think we will start composting. This would be an excellent source of nutrients for our garden!

Speaking of gardening...I cannot wait for spring to arrive {I know, it is only January} so that I can start planting veggies in our own garden that we can juice. No more wasted tomatoes!!!! We will juice {and can} all the extras {Lord willing}! I think we will grow a lot more dark green and leafy veggies {kale, spinach, broccoli}. I think we may also plant a small herb garden to add even more flavor to our juices!

I told you I was excited!!

Here are the recipes I have tried thus far:


Green Drink

3 stalks kale
2 handfuls of spinach leaves
3 carrots {leaves removed}
1 apple

Add all veggies and fruit to juicer and enjoy!


Orange Dreamsicle

4 oranges, peeled
2 carrots
1 banana

Juice the oranges and carrots. Then whip the juice and bananas in a blender for a creamy smoothie. Add a few ice cubes if you like to cool it down.

I cannot wait to try something else!

Do you have a juicer? What are your favorite recipes? I'd love to try them out!


Monday, September 17, 2012

Top 10 Reasons I am looking forward to Fall

Ok, summer is officially my favorite season. I like it H.O.T! I love the sweet smell of chlorine, sweat and sunscreen. I love fireworks {which didn't really happen this year}! I love fresh fruit and veggies! I love playing outside!

But, I am looking forward to the close of summer and starting fall. The crisper air puts a sort of longing in my soul for what is next.....

Top 10 Reasons I am looking forward to Fall 

10. My electric bill is sky high in the summer - especially this summer! We had 50+ days over 90 - and many of those were in the 100s. I like hot weather, but I like it to be cool in the house - especially when I am sleeping. I know, I'm spoiled. So I am looking forward to the lower electric bill.

9. Bonfires, roasted marshmallows and warm wassail. Here is my favorite recipe.


8. Sweatshirts, jeans and hopefully a new pair of boots. Yes, I used to be a cowgirl and I have been turning on the twang again. Yeehaw!

7. Pumpkin picking and hayrides. We live less than a mile {walking distance} from a wonderful pumpkin farm and we love to visit each year. It is such a blessing!!

6. Pumpkin rolls - need I say more? Yummy goodness!!! I could {literally} eat a whole one by myself.

5. Fun crafts - like these awesome Fall Wreath ideas over at Tip Junkie. This is what will be hanging on our front door very soon!


4. Cute hats, scarves and gloves {isn't my model beautiful?}.


3. Beautiful Autumn leaves. It is like the glory of God touching the leaves and erupting in a beautiful splendor of color. And if you happen to see the autumn leaves with a gorgeous red sunrise / sunset - simply breath-taking!!

2. Chili - I love chili! You know, the kind that makes ya sweat. Do you have a favorite recipe? I usually make a venison chili {thanks to my hunter hubby}, but I also like turkey chili and buffalo chicken chili. Mmmmm, my mouth is watering already!

1. The number one reason I am looking forward to the first frost...so that all the ragweed will DIE!!! My nose and eyes are in a terrible state and this horrible weed {which I am sure was created in hell itself} needs to go.


Do you have any fun projects lined up for the upcoming season? I'd love it if you wanted to put a link in the comments so that I can see what you are making {or planning to make}.


Thursday, March 15, 2012

Super Yummy and Easy Dessert

Do you remember the commercial with the Mom throwing flour on her face as if to show how she slaved in the kitchen to make the super yummy Rice Krispie treats? What a great commercial!


Well, I discovered a way to spice up those yummy treats so they are even better.


Photobucket


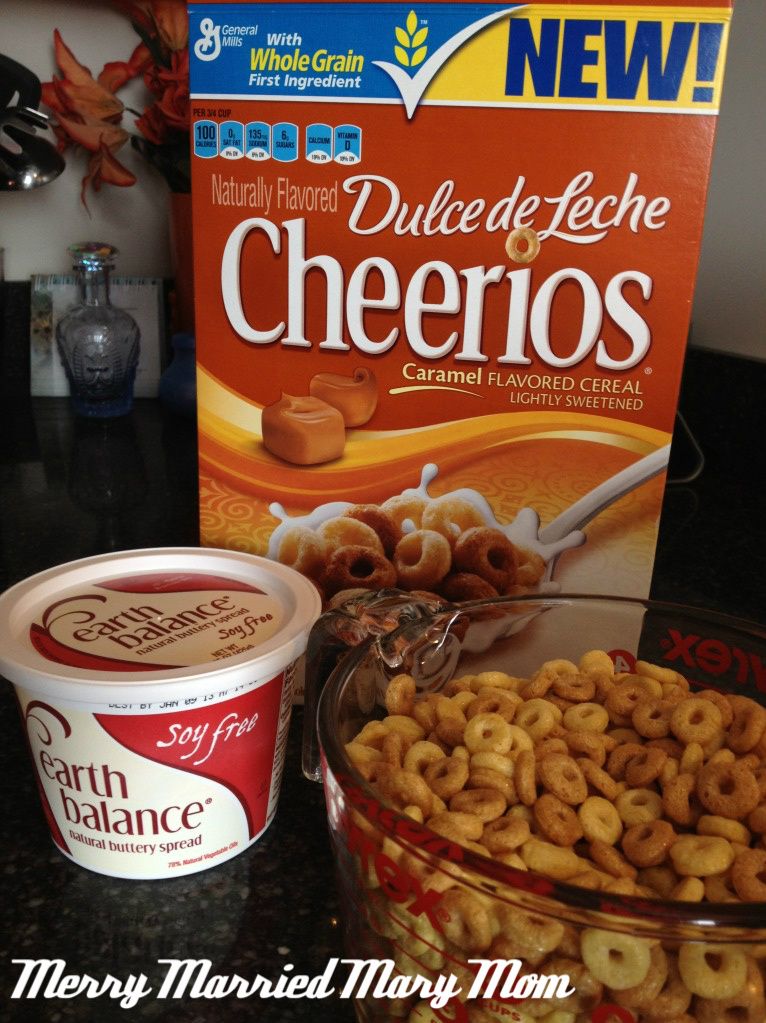
Have you noticed that the Cheerios cereal comes in all sorts of flavors now? Fruit, Chocolate, Plain, Multigrain, Peanut Butter and .....Dulce de Leche (caramel). Well, if you take the Dulce de Leche flavor and substitute it for the Rice Krispie cereal in the treats - you create a wonderful, rich flavor!  And since our family (at least us girls) are dairy and egg free, we substituted dairy free buttery spread (Earth Balance) for a yummy, dairy, egg, and nut (and red dye) free treat!


I made these yesterday and my girls L.O.V.E them! My two year old loved them so much that she snuck back into the kitchen (when she saw I was properly distracted with a sewing project) and ate another bar. By the time I found her, she had run to the bathroom to clean up any evidence. The fact that she had a Cheerio stuck to her elbow and her hair was matted to her sticky face told the whole story.


Photobucket


Caramel Cheerio Treats

1/4 c butter (or substitute margarine or DF buttery spread)
1 package of marshmallows
1 box (8 cups) Dulce de Leche Cheerios


In a large pot, melt the butter. Add the marshmallows and stir until they are melted and smooth. Remove from heat and add the Cheerios. Spread out into a greased 9x13 pan and press down to make the Cheerios more compact.


Let it cool and then cut into squares.


Enjoy!


Don't forget to enter
my
current giveaway (click for details on how to enter).


Monday, February 13, 2012

The Baby Shower

Oh, my sister is expecting her first baby and I am so excited for her!! I can't wait to have another nephew and I know my girls will be thrilled to have a little cousin to hold and dress up (watch out Aunt Shannon - he'll be sporting click-clack dress up shoes and princess attire before you know it!).

Saturday was the baby shower and let's just say that lil Lewis will not have problems finding something to wear. :)

I made him a little rag quilt (learned how to make these via youtube. How blessed are we that we can just go out and watch videos of anything?! That is a post for another day.) and sewed a boppy cover to match. It was kind of hard to let that go - it was SO snuggly! My girls both snuggled with it before I wrapped it up.


My darling daughter and I are dairy free. Since I was bringing her as my date, I wanted to make sure there was something especially yummy, special and dairy free that she (and I) could enjoy. So I made some chocolate covered strawberries and Oreo truffles. If you have not had these before, you are missing out. They are wonderful!

Here is how I made them:


Oreo Truffles

1 package of Oreos
1 8 oz package of cream cheese - softened
(we used dairy free cream cheese)

2 - 8 oz packages of semi-sweet Bakers chocolate


Crush the Oreos in a food processor into fine crumbs.

Combine cream cheese and Oreo crumbs until well mixed (you could do this by hand, but I didn't want to end up with tennis elbow, so I used my mixer). Refrigerate for 30 minutes so that it is easier to handle.

Melt chocolate squares according to the package directions.

Roll Oreo mixture into 1/2 balls. Cover these with the melted chocolate using two spoons (one slotted) to keep the crumbs out of the chocolate.

For half of the truffles, I added about 1/2 tsp of mint extract to the melted chocolate (super yummy!). Nothing beats chocolate mint in my book!

These will harden pretty quickly. If you would like to decorate with sprinkles, you will need to put these on right after you have dipped them into the chocolate (before the chocolate hardens).

Store in the refrigerator until ready to serve.


Tuesday, December 6, 2011

Apple Pie Dip


Need to whip up something quick for a get together? This is the perfect dip! It is easy to make. It is made with things you typically have on hand. Best of all - it is super yummy!

Apple Pie Dip

2 cups of diced apples (this is about one large apple)
1 Tablespoon of brown sugar
1/4 teaspoon cinnamon
1/4 teaspoon nutmeg (or allspice)

  • Stir together in a microwavable bowl. Microwave for 2 minutes (until the apples release their juices and are boiling).
  • In a small bowl, stir together 1 Tablespoon of warm water and 1 Tablespoon of cornstarch.
  • Stir corn starch and water into the apple mixture.
  • Microwave for one more minute
Serve warm with cinnamon pita chips or cinnamon tortilla chips.
That's it. I told you it was easy. My Mom found this on pinterest so I have no idea who to give credit to (other than my Mom - thanks Mom!),

If you have extra time, you could make your own Cinnamon Tortilla Chips.


I shared this at the following site(s):
Tip Junkie handmade projects

Wednesday, July 13, 2011

Chocolate Chip Cookies

Who doesn't love chocolate chip cookies? They are practically a childhood staple in my mind. When our first born was about 6 months old (so not eating solid foods yet), she ended up with a horrible case of hives. That landed us in the ER. To make a long story pretty short, we ended up learning that she had an egg allergy (although that is not what caused the hives).

Egg allergy?!?!  That meant no cakes. No french toast. No scrambled eggs with ham and cheese. No poached eggs on toast. No tuna salad sandwiches. No Easter egg battles. No deviled eggs.

and NO CHOCOLATE CHIP COOKIES?!?!?!

What on Earth? I am a baker. I love to bake. I love baking for my family. So I had to figure something out.

Now, she is 6 and for a while I have been experimenting with different recipes and replacing the egg and dairy (yes, we are also now dairy free) and have had some great turnouts. One of our favorites are these Banana Chocolate Chip cookies.

Even if you are not egg and dairy free - these are fantastic!!

Banana Chocolate Chip cookies

1/4 cup white sugar
1/4 cup brown sugar
1/2 cup margarine (we uses soy and dairy free Earth's Balance)
2/3 tsp vanilla
1/2 smashed ripe banana (about a 3 inch piece)
1 1/2 cups flour
2/3 tsp baking soda
1/4 tsp salt
1 cup chocolate chips (we use Ghiradelli's Semi Sweet or I bust up some semi sweet bakers chocolate squares into chunks)

Mix sugars and margarine until creamy. Add vanilla and banana to the sugar mix. Mix. Add flour, baking soda and salt. Mix again.

Sometimes I think the dough is a bit too thick so I add in about a tablespoon of applesauce.

Stir in the chocolate chips. Spoon tablespoon size balls onto baking sheet. bake 10-12 minutes at 350 degrees.

Tuesday, July 5, 2011

Healthy Tuesday - Easy Stir Fry

Looking for a quick, easy, super yummy and healthy dinner? How about stir fry?

I try to always keep some frozen stir fry veggies in the freezer (the kind without the noodles or rice) and rice in the cabinet so that I can almost always make this yummy Chicken Stir Fry when I have a chicken breast.


Now, let's me show you how easy this is.

I make my own sauce. Making your own sauce is super easy and I'll share my favorite recipe below. So the first step is to make the sauce. But if you are pinched for time, you could use a bottle of your favorite sauce from the store.

Boil the water and get the rice started according to the package directions. I typically use the 15 minute white rice, which is boiling 2 cups of water and then adding 1 cup of rice and cooking covered for 15 minutes.

Heat up the pan to med-high heat and putting in a tablespoon of vegetable oil
(tip: this is too hot for olive oil, it will burn).

Cut up 1-2 chicken breasts (skip this part if you'd rather have a vegetarian stir fry) into 1 inch pieces.

When the pan is smoking hot (you can sprinkle a couple drops of water in it and when it sizzles, you know it is hot!), add the chicken pieces. Stir these around and cook on all sides. This takes about 5-6 minutes.

Place the cooked chicken on a plate and cover it with foil to keep it warm.

Add a little bit more oil (about a teaspoon) and then pour in your veggies. I like to use the frozen stir fry veggies as a base and then add what I have on hand. Good vegetables to choose from are:

Broccoli
Mushrooms
Red, Yellow, Orange or Green Peppers
Onion
Carrots

Oh, my mouth is watering!!!

Stir the vegetables around until they are crisp tender.

Add the chicken. Stir.


Add the sauce. Stir.

Now you can choose to put the rice on the plate or just stir it in with the chicken and vegetables. I just stir it in so that it absorbs some of the yummy sauce.

Plate and enjoy!


Teriyaki Sauce

1 tablespoon cornstarch
1 tablespoon cold water
1/4 c white sugar
1/3 c soy sauce
1/4 c vinegar (either rice vinegar or cider vinegar)
1 clove of garlic
1/2 teaspoon ground ginger
1/4 teaspoon pepper
1/2 teaspoon red pepper flakes (optional for heat)

Put all ingredients in a sauce pan.
Simmer sauce over low heat until thick and bubbly.

I also double this recipe and use it for a yummy sauce for
baked teriyaki chicken.


Tuesday, June 7, 2011

Banana Bread

Banana Bread

This is a modified recipe from one my Mom made for our family. This can easily be egg and/or dairy free by substituting dairy free margarine or butter flavored shortening (altho I don't normally recommend shortening) for the butter and egg substitute (like EnerG) for the eggs. That is how I make it for our dairy / egg free daughter.

1/3 c butter
1/4 c white sugar (can substitute agave nectar)
2 eggs
1 tsp vanilla
1 3/4 c flour (I use 1 c all purpose and 3/4 c whole wheat)
1 teaspoon baking powder
1/2 tsp salt
1/2 tsp baking soda
1/2 tsp cinnamon
1 c mashed bananas (very ripe)
1/2 c nuts (optional)
1/4 c coconut (optional)

Preheat oven 350 degrees. Grease loaf pan. Combine flour(s), salt, baking pwdr, baking soda, and cinnamon - set aside. Cream butter and sugar. Add eggs and vanilla - mix well. Alternating dry ingredients with bananas, slowly add them to the creamed mixture. Mix thoroughly. Stir in nuts (if using). Pour into loaf pan, evening out the batter. Sprinkle with coconut on top (if using).

Bake 40-45 minutes.